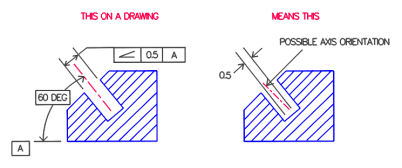
In a mechanical drawing of a part, angularity tolerance allows the designer to specify the degree to which the orientation of an angled part featuremay vary. The angularity symbol is often used to insure that the part can properly mate with another. In GD&T, the degree of permissible variation is not specified as a tolerance on the angle. Rather an indirect method is used where one specifies a tolerance zone at a specified angle from a datum, within which a part feature, axis, or center plane must lie.

In the left figure above, the boxed angularity symbol, tolerance and datum are used to control the center axis of an angled hole. The boxed symbols can be read “This axis must lie within two planes 0.5 apart , the planes inclined 60° to surface A”.
In the right figure above, the tolerance zone created is indicated by the parallel lines.
This form of angularity tolerance applies only in the drawing view in which the tolerance is specified, and requires the permissible variation to be definedfor other views. However, if a diameter symbol were placed in front of the boxed 0.5, this would create a cylindrical tolerance zone which would then apply to all drawing views.
Angularity is used in a tolerance stack when applied to a surface or line element. Angularity refines the orientation of the surface or line element, acting like a flatness control for the purposes of performing a tolerance stack.