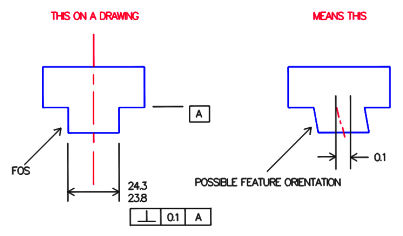
In a mechanical part drawing, perpendicularity tolerance allows the designer to specify the degree to which the orientationof a right-angled part feature may vary. The perpendicularity symbol is often used on a drawing to ensure that mating features can be assembled. In most cases, the perpendicularity symbol is applied to a feature-of-size (FOS) with its base dimension. The tolerance zone is created perpendicular to the specified datum,anda part feature, axis, or center plane must lie within it.

In the left figureabove, the boxed perpendicularity symbol and toleranceare used to control the center axis of a male feature. The boxed symbols can be read “This axis must lie between two planesperpendicular tothe surface at A and spaced 0.1 apart”.
The tolerance zone created isindicated by the parallel lines in the rightmost figure, and applies for the entire length of theaxis extending from datum plane A. Note that this example only controls the orientation in the plane drawn. The other plane (perpendicular to the above drawing) is unaffected by this orientation control.
When the perpendicularity symbol is applied to a FOS, it is often used in a part or assembly tolerance stack. When the perpendicularity symbol is applied to a surface or line on a part drawing, it is refining the orientation of the surface or line element, acting more like a flatness control for the purposes of performing a tolerance stack.
